
Introduction
Building a website doesn’t have to be complex. This guide simplifies the process, showing you how to set up a Hugo website with Docker, manage it using Doom Emacs, and deploy via Cloudflare. This combination offers a fast, flexible, and efficient development to deployment workflow ideal for technical users aiming for high performance and minimal overhead.
Tool Overview
- Hugo: A powerful static site generator that transforms Markdown into a full HTML website, renowned for its speed and simplicity.
- Doom Emacs: An Emacs configuration framework that enhances Emacs’ text editing capabilities, tailored for developers and writers.
- Docker: A tool that packages applications into containers, ensuring consistent environments across development, testing, and production stages.
- Cloudflare: Provides a secure, fast, and reliable global network, with Cloudflare Pages offering an effortless static site deployment solution.
Prerequisites
Before starting, ensure you have the following tools installed and accounts set up:
- Docker: Install from Docker’s official site.
- Git: Installation guide available at Git’s official book. Alternatively, for a GUI approach, GitHub Desktop.
- Doom Emacs: Set up by following the instructions at the Doom Emacs GitHub repository.
- Cloudflare Account: Sign up at Cloudflare’s website and follow the steps to add your domain or choose a provided
.devdomain.
Docker and Hugo Setup
Quickstart with Docker
Creating a Hugo site with Docker ensures a consistent development environment. Use the floryn90/hugo Docker image for a minimal setup that includes all necessary features.
Create a New Hugo Site:
Execute the following command, replacing placeholders with your details:
docker run --rm -v "<path-to-your-projects-directory>:/src" floryn90/hugo:0.123.4-ext-alpine new site <your-site-name> --format yamlRun the Hugo Server:
Start the server to view your site locally at http://localhost:1313:
docker run --rm -p 1313:1313 -v "<path-to-your-projects-directory>:/src" floryn90/hugo:0.123.4-ext-alpine serverTheme Installation: PaperMod
PaperMod is a high-performance Hugo theme. Install it for a visually appealing and functional site layout.
Initialize a Git Repository in your site’s root directory:
git initClone the PaperMod Theme:
git clone https://github.com/adityatelange/hugo-PaperMod themes/PaperMod --depth=1Add the Theme to Git:
git add themes/PaperModConfiguring Your Hugo Site
Adjust hugo.yaml to define your site’s global settings, like baseURL, language, theme, and more. Tailor the configuration to enhance site development and integration with various services.
Basic Configuration:
Set your site’s URL, language, title, and theme. Customize further for inline shortcodes, SEO, and syntax highlighting.
Advanced Settings:
Configure languages, site parameters, output formats, and privacy settings according to your preferences and needs.
Example Hugo Configuration
# Basic Configuration
baseURL: https://example.org/ # The root URL where your site is accessible.
languageCode: en-us # Default language, here set to American English.
title: My New Hugo Site # The global title of your site.
theme: "PaperMod" # The theme your site uses, "PaperMod" in this case.
# Features and Behavior
enableInlineShortcodes: true # Allows using Hugo's inline shortcodes.
enableRobotsTXT: true # Generates a robots.txt file for search engine instructions.
buildDrafts: false # Controls whether drafts are built.
buildFuture: false # Controls whether future-dated content is built.
buildExpired: false # Controls whether expired content is built.
enableEmoji: true # Converts emoji shorthand in content to actual emojis.
pygmentsUseClasses: true # Use CSS classes for syntax highlighting styles.
googleAnalytics: G-Code-Here # Google Analytics tracking ID.
# Languages Configuration
languages:
en:
languageName: "English" # Name of the language.
weight: 1 # Priority of the language.
taxonomies: # Defines taxonomies for the site.
category: categories
tag: tags
series: series
menu: # Defines the main menu items.
main:
- name: Archive
url: archives
weight: 5
- name: Search
url: search/
weight: 10
- name: Tags
url: tags/
weight: 10
- name: Portfolio
url: https://bramvanrompuy.be
# Site Parameters
params:
defaultTheme: auto # Theme mode (auto, light, dark).
env: production # Environment setting.
title: BVR Articles # Site title for display.
ShowShareButtons: true # Toggle share buttons.
ShowReadingTime: true # Display reading time.
displayFullLangName: true # Show full language name.
ShowPostNavLinks: true # Navigation links between posts.
ShowBreadCrumbs: true # Breadcrumb navigation.
ShowCodeCopyButtons: true # Copy code button in code blocks.
ShowRssButtonInSectionTermList: true # RSS button in sections.
ShowToc: true # Table of Contents on pages.
tocopen: true # TOC starts open.
comments: true # Enable comments.
description: "A place where you can find tech related articles..." # Site description.
author: Bram Van Rompuy # Author name.
giscusTheme: preferred_color_scheme # Theme for Giscus comments.
disableComments: false # Toggle comments globally.
images: ["papermod-cover.png"] # Default site images.
homeInfoParams: # Custom parameters for the homepage.
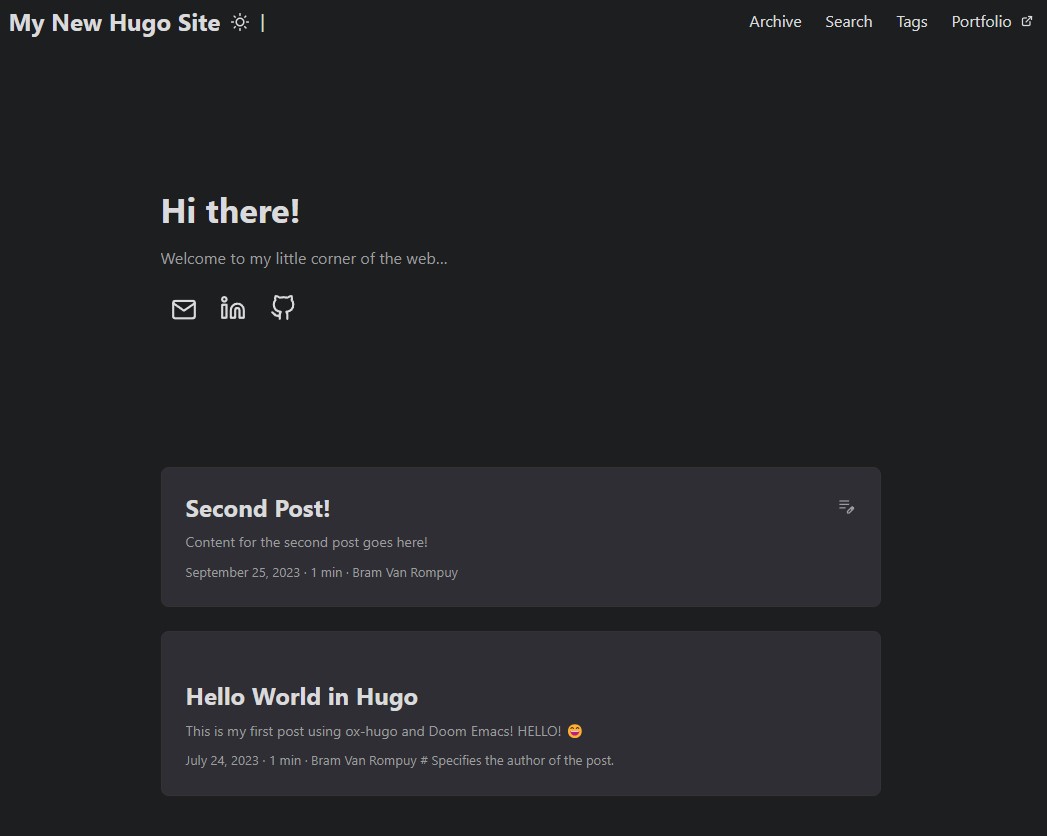
Title: Hi there!
Content: Welcome to my little corner of the web...
socialIcons: # Social media icons and links.
- name: email
url: "mailto:bram.van.rompuy@gmail.com"
- name: linkedin
url: "https://www.linkedin.com/in/bram-van-rompuy/"
- name: github
url: "https://github.com/BramVR"
# Output Formats
outputs:
home:
- HTML
- RSS
- JSON # Essential for certain themes or features.
# Content Rendering Options
markup:
goldmark:
renderer:
unsafe: true # Allows HTML in Markdown files.
highlight:
noClasses: false # Use classes for syntax highlighting.
# Privacy and Third-party Services
privacy:
vimeo:
disabled: false # Toggle Vimeo embeds.
simple: true # Use a simple privacy-enhanced embed.
twitter:
disabled: false # Toggle Twitter embeds.
enableDNT: true # Enable "Do Not Track".
simple: true # Use a simple embed.
instagram:
disabled: false # Toggle Instagram embeds.
simple: true # Use a simple embed.
youtube:
disabled: false # Toggle YouTube embeds.
privacyEnhanced: true # Use privacy-enhanced mode.
services:
instagram:
disableInlineCSS: true # Disable inline CSS for Instagram embeds.
twitter:
disableInlineCSS: true # Disable inline CSS for Twitter embeds.Enhanced Development with Docker Compose
For live reloading and a smoother development experience, use Docker Compose.
Setup Docker Compose:
Create a docker-compose.yml in your Hugo project’s root with the necessary configuration for the Hugo server and live reloading.
version: '3.8'
services:
  server:
    image: floryn90/hugo:0.123.4-ext-alpine
    command: server -D --poll 700ms
    volumes:
      - ".:/src"
    ports:
      - "1313:1313"
This configuration defines a single service called server that:
- Uses the
floryn90/hugo:0.123.4-ext-alpineimage. - Executes the
hugo servercommand with flags-Dfor including drafts in the build and--poll 700msfor checking file changes every 700 milliseconds, which enables live reloading. - Mounts the current directory (your Hugo project) to
/srcinside the container, ensuring changes made locally are reflected inside the Docker container. - Maps port
1313on the host to port1313inside the container, making your site accessible at http://localhost:1313.
Run Your Site:
Launch your Hugo site with docker-compose up for development with live reloading. Stop with docker-compose down when done.
Integration of ox-hugo with Doom Emacs
Integrate the ox-hugo package with Doom Emacs for efficient Hugo site management. This setup allows you to write content in Org mode and export it directly to Markdown for Hugo.
Understanding ox-hugo and Hugo
ox-hugo is an Emacs package that bridges Org mode content creation with Hugo’s static site generation. It converts Org files into Markdown, enabling a seamless content management workflow.
- Write content in Org mode with Hugo-specific properties.
- Export to Markdown with ox-hugo for Hugo site generation.
Configuring ox-hugo in Doom Emacs
Include ox-hugo in your Doom Emacs setup by adding it to .doom.d/init.el:
(org
  +pretty
+hugo)- Reload Doom Emacs with
M-x doom/reloadto apply changes.
Creating and Managing Posts
Create a Post:
Write a “Hello World” post in Org mode, setting Hugo’s base directory, section, and custom front matter.
#+HUGO_BASE_DIR: .
#+HUGO_SECTION: posts

* Hello World in Hugo :HelloWorld:
:PROPERTIES:
:EXPORT_FILE_NAME: hello-world
:EXPORT_DATE: 2023-07-24
:EXPORT_HUGO_CUSTOM_FRONT_MATTER: :comment true
:END:

*** My first post using ox-hugo and Doom Emacs!
    HELLO! :smile:
Export to Markdown:
With the cursor in the post subtree, export using C-c C-e H A.
Add More Content:
Follow the same structure to add additional posts in the same org file under the previous post.
* TODO Second Post! :tutorial:emacs:hugo:
:PROPERTIES:
:EXPORT_FILE_NAME: the-second-post
:EXPORT_DATE: 2023-09-25
:EXPORT_HUGO_CUSTOM_FRONT_MATTER: :comment true
:EXPORT_AUTHOR: Bram Van Rompuy
:END:

*** Content for the second post goes here!
Previewing and Deploying
After creating content with ox-hugo:
Run the Hugo Server with Docker to view your site locally:
If you website is already running, you can view it to see the update.
Otherwise you can use the docker command: docker-compose up
View Your Content:
The “Hello World in Hugo” post and any additional content will be visible on your local Hugo server, styled according to your site’s Hugo configuration.
Preparing for Deployment
Ensure your site is ready for deployment:
Add Changes and Commit:
git add .
git commit -m "Prepare site for deployment"
Push to GitHub:
git push -u origin main- Adjust branch name as necessary.
Conclusion:
This part of the guide focuses on the critical steps for integrating ox-hugo with Doom Emacs, creating content, and preparing for deployment, ensuring a straightforward workflow for Hugo site management.
Setting Up Cloudflare Pages
After pushing your Hugo site to GitHub, follow these steps to deploy your site with Cloudflare Pages:
Cloudflare setup with Github
-
Create a Cloudflare Account and log in if you did not create one before.
-
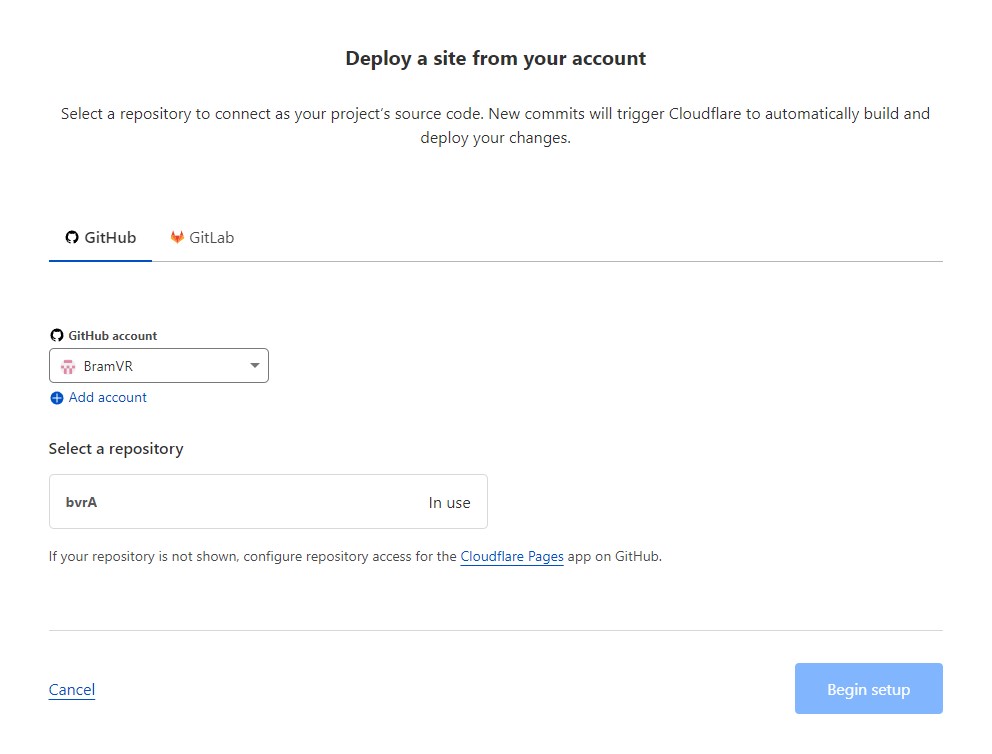
Create a New Project on Cloudflare Pages by connecting to your GitHub repository. Cloudflare will ask for permission to access your GitHub repositories.

-
Select the Repository containing your Hugo site. Click on `Add Account` to add your account. You will be lead to the Github website to add your account.
-
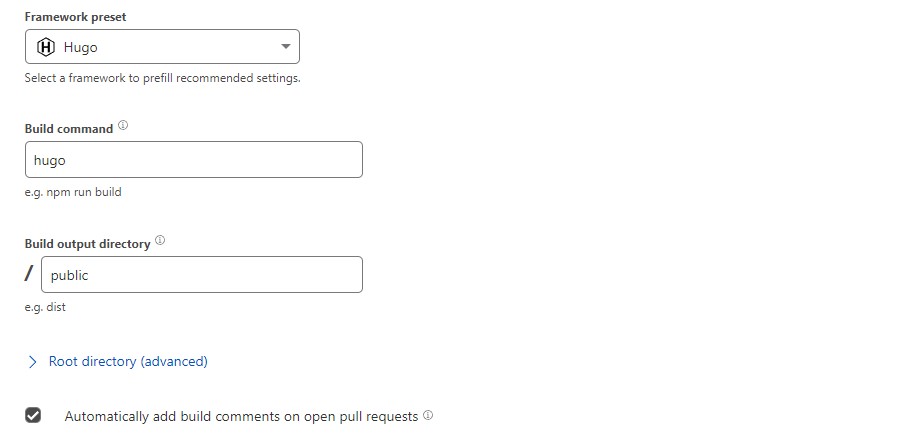
Configure the Build Settings for your Hugo project. Set the framework preset and choose `Hugo` Set the build command to `hugo` and specify the build output directory, typically `public`.
-
Set Environment Variables Add an environment variable `HUGO_VERSION` with the value of the Hugo version you are using, like `0.123.4`.
-
Start the Build Process. Cloudflare Pages will automatically build your site when you push changes to your linked GitHub repository.
You can see the process in the pages dashboard.
-
Deployed website
Cloudflare Pages provides a seamless CI/CD pipeline, automatically building and deploying your site every time you push new changes to your GitHub repository.
It also assigns a unique `.pages.dev` domain to your project, though you can configure a custom domain if you prefer.
Conclusion
Your website is now up and running using Doom Emacs for writing, Docker for clean local development, and Cloudflare Pages for sharing your site with the world!
In this guide, you learned how to use Emacs and the `ox-hugo` package to make writing and organizing your website easy and fun. Docker helped keep things consistent, making sure your site works the same way everywhere. And by deploying with Cloudflare Pages, your site is now super fast for visitors from all over, thanks to Cloudflare’s big network.
Putting your site online with Cloudflare Pages showed how everything just works together. Now, your site is out there for everyone to see, and any updates you make will show up online automatically.
This whole process shows a smart way to build and manage a static website today. Now that your site is live, you can keep adding to it, trying out new things in Hugo, or making it look even better.
Thanks for following this guide. I hope it helped you see how combining these tools can make managing a website a lot smoother.